Here it is how i got it , somebody had done everything in black, it was all wrong.

here it is geting striped down....


next i sent the frame to the sandblasters, all the paint striped off it, then redid the frame in two pack silver, as close as i could get it to the original colour, going off old photos


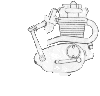
next step was the engine. as anyone whos ever riden at menai will know,menai mud stains! so everything was striped down, paint stiped, etc.

The engine ran fine,but after pulling it apart, we found the bore was glazed, so i had it rebored,and a larger piston with new rings fited.


All of the side covers on the motor were damaged and scratched deeply, i saved most lettering apart from I think the word "magnesium" on one cover.
All were refinished in two pack silver,matched off the original parts.


next i detailed the cylinder after geting it back from the machinist. redoing it in black,with the edges showing the aloy still..


And heres the motor all back together, the gear box was in perfect condition, so it was left as is.

Engine bolted back on the frame,

Next i sent the front forks to the bike mechanics to be rebuilt,and ordered some new parts from japan, while i was waiting for all that , i got to work on repairing and painting all the cosmetic trims..


The seat was in excelent original condition, so it was redone with vinal black paint..

Ok forks back from the mechanic here, and steering head fited with new style needle roller bearings, new brake and clutch levers.
the rear shocks are the original items, just polsihed and cleaned back up, they still seem to be ok.

handle bars are renthals,and were gold,but i have sanded off all the gold and polsihed them up so they look like ty items.

Now for the fuel tank.
It had a rather large dent in one side, so first off i made up a paper template of how the yellow and white was,and where the stickers should be.
next i paint striped it back to metal,or aluminium, and worked out the dents as best i could with levers through the filler hole,and then finished them off with body filler.

heres the tank in two pack hi-fill primer

After blocking down the hi -fill,i painted the tank all yellow,using colour i had matched up before i striped it back, let the yellow dry,then useing my template, marked out with fine line masking tape where the white should be.
after painting the white,and removing all the tape, i folowed the line with black pinstripe,and then placed the yamaha stickers where they should be....Then sealed the lot with two coats of two pack clear.

Next the exhaust was sandblasted and powder coated, a pic of it here trial fitted..

Coming together now, just waiting on the accelorator cable to turn up from japan, so i can fit the carby,air box and all the freshly painted bits waiting for it....


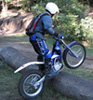
Well, finaly after 3 weeks the cable arived, and within an hour the bike was back together!


The bike fired up on the second kick on a cold night here,and runs like a dream.
Theres a lot of other new bits i forgot to mention ,like swing arm bushes,brake shoes,cables etc ..but you get the idea im sure.
A big thanks to local forum ty guru David lahey for all his help and information on how an original TY should look!
.jpg)

.jpg)